13 October 2018
It's finally time to seal up the crawl space. The first order of business is to stop the cats from using it as a litter box. This was harder than it looked because apparently cats are quite good at finding alternative pathways. Here is our crawl space door which I made from salvaged 3/4" tongue and groove porch floor.

Next step is to roll out the 6 mil thick black plastic carpet. There are a lot of fancy crawl space sealing plastics on the market. I went with this basic stuff because it's inexpensive and the crawl space is not going to see a lot of traffic. 6 mil is durable enough and it will stop water vapor just as well as 40 mil thick fiber reinforced fancy stuff. It's tedious, but not difficult with the two of us.
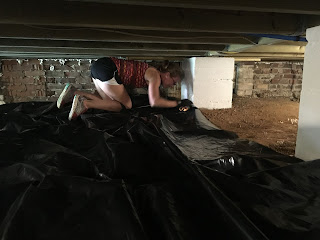
1/3 done. Having 12 lights in the crawl space is paying off.

Here I am under the office on the north side of the house, fitting the plastic around the stacked stone piers. This room has the least amount of clearance under it.

We are sealing the plastic to the foundation parts wherever we have a good smooth(ish) surface to work with. We are using 2" wide butyl tape (basically semi-solid roofing tar) to seal the plastic to the painted concrete blocks. I've put the tape in place and then will wrap an 8" wide ring of plastic sheet around it, taping down all the seams with house wrap tape.

Now that the crawl space is closed up, we didn't need to keep an access hole open under the back door. I decided it would be real nice to rebuild a little bit of the back porch. Before I could do this, I wanted to fix a little bit of wood rot on one of the corners.

It turned out that the entire corner was rotted. Over 9 feet of a 4" x 5" solid wood post had been reduced to saw dust held together with dried termite spit. Pretty much par for the course. I removed all of this and replaced it with a new post made from 3, 1-1/2" x 4" treated boards laminated together, covered with two new plain trim boards.

Then I built the framing for the porch.

Then I laid the new floor boards in place. I'm leaving these loose for now because they're still wet from the store and need to dry out before we can square the edges and add the tongues and grooves. This new porch is level. All three doors that open on to it are at different heights.

The inspector is making us insulate any walls that we have opened up. I believe that the reason there isn't a lot more wood rot of the exterior walls is because there is not insulation in them. This allows air to circulate through the walls which helps them to dry out whenever they get wet. I explained my point of view to him and asked if he would make an exception.
He said "no".
Shifting my research led me to this product. It's called Delta-Dry and it's designed to go on the outside of a house or building where it provides an air gap between the sheathing and weather shield (such as siding). It allows water that gets behind the siding to drain down and out of the wall, and air to move along and dry everything. Props go to Matt Risinger and his Build Show on YouTube.

In our case, because the siding is already on the house, we are simply putting it against the siding between the studs to create an air gap between the siding and the insulation. We cut it to fit and staple it in place. Easy.

Amy started working on the room that will be a 1st floor master bedroom. The previous owner (Linda) had this floor sanded and then finished with polyurethane. Amy is trying a couple of ways to remove the poly without more sanding.

She is also cleaning the walls and ceiling, which have varying amounts of soot or smoke stains. There are shadows in the soot stains left over from different things that were hanging on the walls.


We removed a large mantel that Linda had placed in the room. This exposed the paint outline from the original mantel which we found had been left in the barn. Yes!

Once all the Delta-Dry was installed, we started installing insulation. We chose to use Rockwool instead of fiberglass because it's very easy to cut and handle. It also doesn't release a bunch of fibers in to the air that stick to your clothes and skin. This particular product is designed to be very fire resistant and better at dampening sound, while still providing some R value to the walls.

Since our stud spacing varies a lot and rarely matches the modern protocol of 16" or 24" on center, we purchased batts made to fit 16" centers and put it in sideways, cutting short lengths to fit between our studs.

Here I am splitting a small piece of batting through the middle to fit around some electrical wire.

An example of the finished installation.

Once we get the air barrier up, we'll be ready for the next inspection check point. With approval, we'll be able to start putting beadboard back up on the walls!
I would hate to have to run everything past an inspector. I've done a lot of work on my home and never had to have it inspected. That must cost a fortune....
ReplyDeleteFor us, it's worked out pretty well. Sure there are things that the inspectors had us do that we weren't intending to do. We've been dinged by permit fees eight or nine times, but overall the process and following code has helped us create safer and better functioning systems in the house, especially with regards to the plumbing, and a fair bit with the electrical. Structurally it's a toss up. Some of the work we were asked to do I think is over-engineered, but no harm done. I definitely not like the 'one-size-fits-all' approach that the code for HVAC has imposed on us. As a percentage of our overall budget, I don't think involving inspectors had made a major impact.
Delete