14 September 2017
In the past few weeks we have rebuilt three more sections of brick skirt wall. Part of this work has involved removing parging from some of the areas of the original skirt wall. I tried using a chisel but the parging is made from more modern cement which is harder and stronger than the bricks and I was doing as much damage to the bricks as I was to the parging. We switched to using a grinder instead. Very tedious, and dusty, and we still have to be very careful not to gouge the bricks. This photo shows a hole where a 4x10 crawlspace vent had been installed. When I removed it the bricks around it just fell out. The half brick skip pattern is original but the holes were filled in at some point. We are going to fill them again because our goal is to have a sealed crawlspace.

All the parge is removed and we have repointed the bad mortar joints. Now we are rebuilding to fill the hole that we ended up with once all the parge removal was done.

And this section is all done!

Around the corner to the right are two more sections of skirt wall that needed to be rebuilt. The new crawlspace door is framed in on the left side.
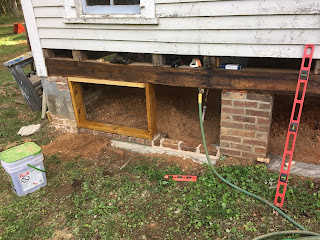
You can see that we are trying to keep the skipped half brick pattern from the original construction.

And now both of these sections are done. On the far left is an original pier. In the middle and on the right are piers that I built using reclaimed bricks from the chimney that fell over. We used old bricks and old mortar to fill in the two sections. The round hole in the left section is for the dryer vent. The gray pipe in the ground to the right is for our electric service. I also buried a piece of conduit underneath one of the skirt walls in case we decide later to run electricity out to the shed and barn. Once we replace the siding here we will run the hose spigot through the sill beam (a hole through single layer brick would not be substantial enough, and we don't want to drill a hole through a 16" pier).

We also have been working on building the new floor structure for the kitchen and dining room. I was cutting them to length and Amy was putting them in.

Joist hangers all around.

All done here after a couple days (okay, maybe 3) of work. It feels very strange to be standing in the room at floor height again.


Up next is the floor structure for the utility closet where we will put our water heater, and the side porch on the north side of the house.
Did you end up doing the new floor joists one room at a time or did you end up doing the majority of the 1st floor all at once? I have to do basically the same thing with a 1850 simple fame house; however with a much smaller foot print. I'm fascinated with your project and the fact you are DIY'ing this. Amazing Progress!
ReplyDeleteWow! I don't know why I never saw this post until now. My bad. Overall, my experience with Blogspot has been mediocre at best.
DeleteI'm sure you've moved past the flooring part of your project by now, but we did the floor joists in the pantry/half bath/laundry as one project. The kitchen/dining/keeping room, which you can see in the last picture, was another project. The two areas are separated by a sill beam which used to be supporting the exterior wall on the north side. These areas comprised the bottom leg of the "T" of our house. The floor joists in the rest of the house did not need replacing like this area did.
This post on basic repair and maintenance skills is incredibly useful for homeowners. It’s always good to have some DIY knowledge, but when it comes to more complex tasks, it’s essential to consult a plumber near meto ensure everything is done correctly and safely. Thanks for sharing these helpful tips!
ReplyDelete